
Aim
The aim of this guide is to provide practical guidance on the preparation of trophy heads.
If heads are to be cut on a regular basis, then it is recommended that a jig be purchased, as this gives an accurate and consistent line of cut.
Equipment:
- Sharp, pointed knife.
- Tenon saw or proprietary jig, complete with purpose-made saw.
- Boiling pan suited to size and species. Clamps may assist with the boiling process.
- Soda crystals (1 teaspoon per litre, added during boiling, aids the cleaning process) or biological washing powder.
- Long-nosed pliers.
- Blunt knife to break out unwanted nasal bone etc.
- Wire snippers/cutters to remove bone to allow access to brain/nasal cavity.
- Hydrogen peroxide or peroxide kit.
- Rubber gloves.
- Eye protectors.
- 1-inch paint brush
- Power-washer.
Antler mount preparation
As part of the general lardering process, the head and in certain cases, the jaw of the animal will be removed*.
Skinning
- Skinning the head prior to boiling is optional. If skin is to be left on, make a cut through the skin over the top of the nose and through the sinew in the roof of the mouth.
- Skin the head by incising from the back of the mouth opening, and cut in a direct line to the back of the head. Then skin upwards towards the eye sockets, nose and coronets, following the contours of the skull
Boiling
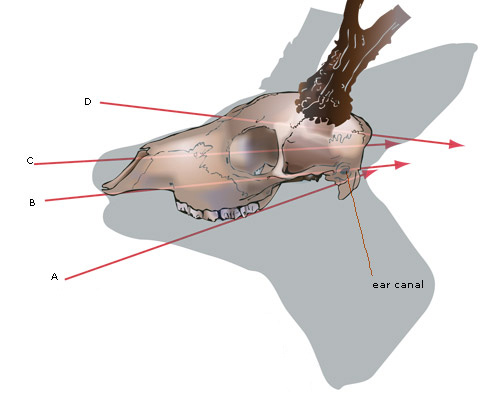
measuring guide. A Full skull: Teeth remain part of trophy.B Long cut: No teeth, eye sockets left intact, full length of palate. C Short nose cut: Cut through the eye sockets. D Skull cap: More commonly used on larger species.For exceptional trophies, it is recommended that the skull remains uncut with the lower jaw removed.
Boiling time is dependent on the animal’s age and species and can vary from 15 to 30 minutes, or more for larger species. The smaller the species and younger the animal, the less time boiling time required, otherwise the bones will fall apart. If the two nose bones at the front come away, then bleach separately, dry and superglue into position.
- Before boiling the head ensure the eyes have been removed or punctured.
- Place the skull in boiling water with added soda/washing powder and with the coronets above the water line. Clamps may assist with the boiling process.
- Take care not to over-boil particularly for long and full cuts (Figure 1: A & B). A good indication that the head is ready is the splitting and shrinking of the membrane over the nose.
- Dip the head in cold water and remove the meat and sinews with a blunt knife or a pressure washer.
- From the underside of the skull break out the unwanted bone and nasal passages using pliers and a knife.
- Finish off by scrubbing the skull with a stiff nailbrush or similar implement, taking care around the delicate nose bones in the long and full cut.
Cutting

D Skull cap: More commonly used on larger species.For exceptional trophies, it is recommended that the skull remains uncut with the lower jaw removed.
- Cutting can be carried out before or after boiling depending on preference. Laying the head on its side, mark out a line to cut with the point of a knife.
- Before performing the short nose cut, remove the eyes.
- Place the head in an adjustable cutting clamp or hold the skull and antlers firmly on the bench. Carefully, using a saw, make the desired cut.
- Without use of a cutting clamp, take care to keep the cut square from side to side. Once cutting has started, sight along the saw blade across the nose to ensure that the line will emerge at a similar level on the other side.
Any unevenness in the cut can be removed later by sanding when the skull has dried out completely (a mask should be worn for this process). Remove the brains after cutting.
Bleaching
- Ensure necessary protective clothing such as rubber gloves and eye protection is worn for this part of the procedure.
- Carry out this process while the skull is still wet. If it has dried out, then re-soak for a number of hours.
- Use a solution of hydrogen peroxide (30%). Comply with the manufacturer’s recommendations and note any warning labels relating to Control of Substances Hazardous to Health Regulations 2002 (COSHH)1,2.
- Take care not to get bleach on the coronets or antlers.
- Before bleaching the outer skull, paint the cavities on the underside with bleach. This helps cure it and remove unwanted smells.
- Place cotton wool or absorbent paper round all the contours of the outer skull, ending immediately below the coronets, then paint with bleaching agent. Paint again after three hours if required.
- The bleaching time will again depend on the species and age of the animal and the concentration of the hydrogen peroxide used. If using 30% concentration the bleach may be left on for several hours up to 12 hours (i.e. overnight). Weaker solutions may require longer. The use of household bleach should be avoided as this may weaken the skull and cause the bone to crumble.
- Leave the skull to dry.
Trophy Measurement
Accredited judges of the CIC3 assess trophies by measurement and weight using CID Measurement Formulas. Where a head may be worthy of a medal, present for measurement as full skull trophy, prepared as described with the lower jaw removed. Heads should be prepared in the normal way with the lower jaw removed. Note, the use of artificial colouring will not be accepted in trophy measuring.
Export
Trophies should be cleaned of all flesh and bleached (disinfected). Antlers should be wrapped and packed securely so as to present no sharp edges. Heads prepared in this way may be transported as luggage.
Where there are national animal health restrictions in place check with the local Animal Health Office for guidance4.
Full-mounts and accompanying capes require to be prepared at point of origin and are best transported to a taxidermist by carrier**.


Aim
The aim of this guide is to describe the skinning or 'caping' process required to produce a full-head trophy mount.
General information
If the head is to be mounted by a taxidermist, the head is normally removed complete with the cape. The skinning off of the cape is critically important to the look and quality of the completed mount. A short neck on larger head mounts may look unbalanced and ‘front heavy’. It is therefore better to skin off too much cape rather than too little.
If the head is required to be skinned as well, specialised advice should be sought. If the head and cape is going to the taxidermist it is advisable to ask in advance how they would like it skinned, stored, packed and delivered.
Skinning
- Bleed the deer back through the diaphragm to keep the neck skin intact.
- Remove any blood splashed on the coat during carcass preparation and transportation.
- With a sharp knife make a cut circling the body behind the shoulder at approximately the mid-way point of the rib cage behind the front legs. Cut the skin around the legs just above the knees. An additional slit will be needed from the back of the leg and joining the body cut behind the legs.
- Peel the skin forward up to the ears and jaw exposing the head/neck junction.
- Alternatively make one long cut up the middle of the back of the neck to between the ears which stops 2" back behind the antlers. Make a ‘V’ shaped cut from between the ears up to the base of the antlers.
- Peel back the skin from between the shoulder blades and skin forward towards the head.
- Cut into the neck approximately 3" down from the head/neck junction. Circle the neck, cutting down to the spinal column. After this cut is complete, grasp the antler bases and twist the head off the neck.
- The skin can then be rolled up ready for storage or transportation.